Psychologic support is one of the most important parts of the fitting procedure and should not be taken lightly. Announcing to the parents that their child has a retinoblastoma is always an unbearable situation. It conjures up extreme feelings of guilt, stress, and fear in the parents and the child. Can you imagine finding out that your long-awaited child, the perfect blank slate on which you projected all your hopes and dreams, has turned out to be a “sick” baby? The shock will be all the more terrible when enucleation is the only possible solution. The news is absolutely devastating.
The process of accepting the disease and grieving for the loss of the “perfect child” is essential for the physical and mental development of the child.1
Parents who refuse to accept the reality of the situation are in denial and will have great difficulty accepting the “new image” of their child with her/his prosthetic eye. The prosthesis will never be “perfect” enough for them, and the child will end up internalizing the negative image reflected back at him/her as a result.2
The future of this child—who is usually too young to understand the disease and its consequences—depends on his/her parents’ acceptance of the situation and readiness to make plans for their child’s future.2
Our role is to help the child rebuild his/her sense of self around a new body image and the image s/he projects to others.
The first step to a successful fitting procedure begins with the first appointment. Ideally, the first consultation should be 4–6 weeks after the enucleation. By starting the fitting procedure early, we not only increase the likelihood of good esthetic results, but also support the positive psychosocial development of the child. At the first appointment, it is important to understand the dynamics of the parent–child relationship. This will helps us develop a better connection with the child and earn his/her trust.
In 2008, the findings of French ophthalmology research3 highlighted the psychologic, ethical, and social impact of this first appointment. It demonstrated the importance of providing the child with age-appropriate information about the fitting procedure and working with the parents to accept and reiterate the information given to their child.
If you are sensitive to the situation and take the right approach from the beginning by explaining the prosthetic fitting procedure and its limits, it will help to eliminate any anxiety the child and/or the parents may feel in the future.
At this first appointment, if possible, the postoperative conformer should be replaced by a temporary aesthetic ocular prosthesis. This temporary prosthesis not only serves to hold the conjunctiva in place and re-educate the eyelids, but also changes the child’s appearance for the first time after the enucleation surgery. This is the first step on the path to accepting the ocular prosthesis.
Approach to the Actual Fitting
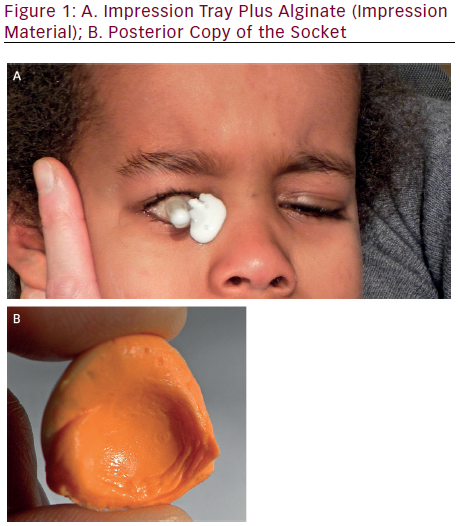
The second step concerns the best way to take the impression of the socket.
It is important to fit children properly to provide a good fitting prosthesis and promote a healthy socket4 (see Figure 1A and B).
In most cases, it is possible to take the impression of the socket from 6 to 8 weeks after the enucleation, when sutures have been reabsorbed.
Going to the ocularist, the greatest fear of the child and the parents will be that the child will experience pain in the fitting of the new eye. We need to make it clear that this will not happen, that only minor discomfort will be experienced. It can be helpful to use gentle facial expressions, humour, and sometimes a distraction such as a toy to explain this step.
In most cases, a decent impression of the socket can be accomplished without the use of any medical aid, such as general anesthesia. But if the ophtalmologist performs a clinical examination of the socket under anesthesia, we can take advantage of this opportunity to make an impression of the socket and also to minimise the anxiety of the child who will not be aware of the discomfort imposed by the socket impression.
Prepare the child by explaining what will happen at his/her level of understanding. This will get rid of fears and prevent his/her imagination from running wild. Important points to mention include the following: the impression does not hurt, it will be over quickly, it feels a bit cold and may sting slightly at the end of the process, like getting soap in your eye.5
As we will have a long-term relationship with the young patient, we need to make sure the child’s first experience with us is a positive one, which means avoiding the use of force. This is important in building a sense of trust and rapport.
We often lay babies down to take the impression of the socket. One or both of the parents usually help us to hold their child down. As soon as the impression is done, the parent holds the child to comfort him/her. The crying generally stops immediately.6
Technical Approach
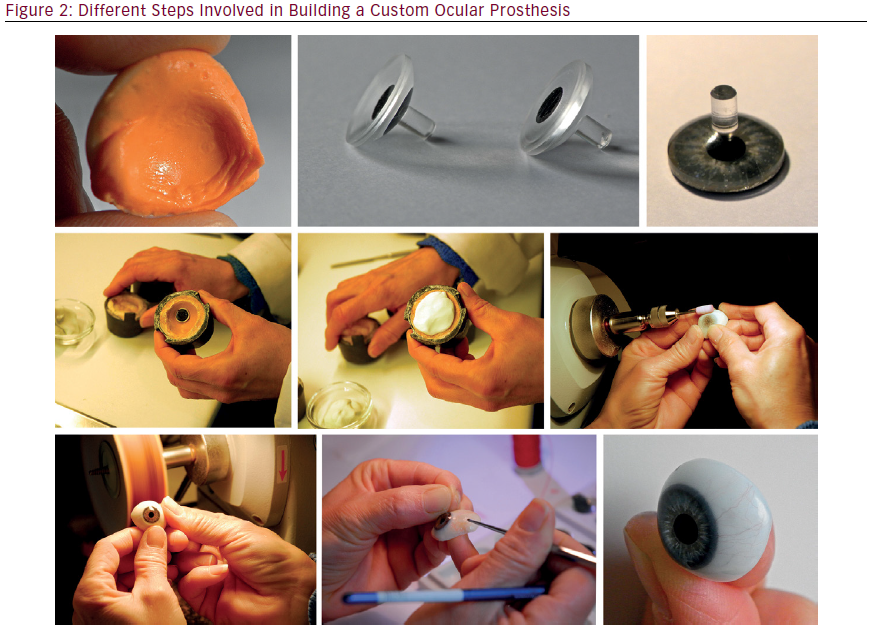
The third step is the prosthetic replication technique for the pediatric patient, including replication of the iris (see Figure 2). Familiarity with the anatomical development of the eye is especially important, as with this knowledge the ocularist is better able to create a realistic result when designing the iris and scleral segments of ocular prostheses for babies and young children.
From ophthalmology and the study of the microscopic anatomy of the iris, we know that newborn Caucasian babies are often born with blue/gray eyes. This phenomenon can be explained by the lack of neurologic and neurosensory maturity in the child. Exposure to light will later activate the melanocytes, and the genes responsible for eye colour will then be expressed.
From embryology, we know that the crypts of Fuchs, in the internal area of the anterior surface of the iris, are dehiscence zones of varying depth with a concavity directed towards the pupil. Their backgrounds appear to be cross-linked and their edges are formed by fleshy arcs.7–11
Iris Painting
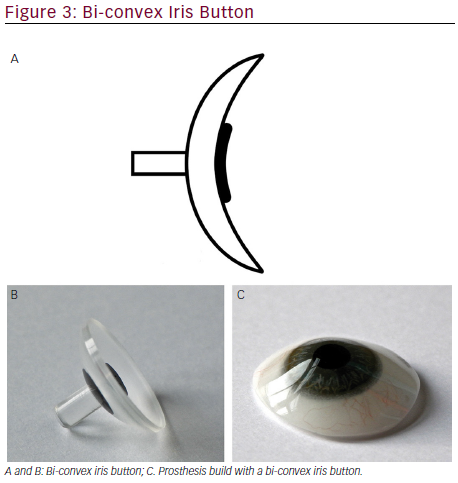
However, as part of the normal embryologic development of the iris, the collarette and crypt layer are not visible in newborns. The result is an iris with little detail on the collarette and stroma. In newborn infants and toddlers up to age of 12 to 15 months, the anterior chamber is very shallow and the iris surface is convex.8
Given our understanding of the anatomy of the eye, we know we need to paint on a bi-convex iris button in order to duplicate the iris and achieve the best visual result (see Figure 3A to 3C). With this particular shape, we are able to paint the foremost plane, providing the visual effect of a shallow anterior chamber (see Figure 3B).
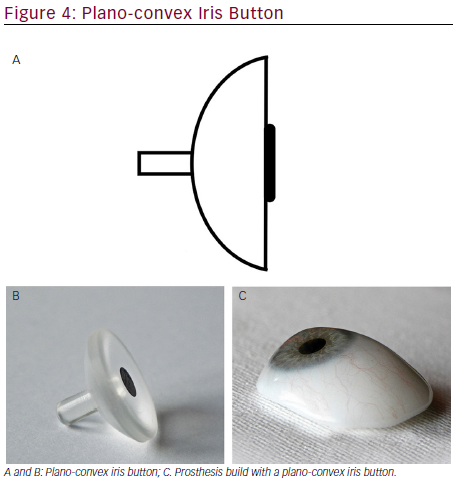
As the child gets older, the iris flattens and the anterior chamber depth increases. To provide the right depth effect on the iris of the prosthesis, we now paint on a plano-convex iris button (see Figure 4A to C). Indeed, the shape of the iris button is used to paint the iris more in the background, which gives the visual effect of a deeper anterior chamber (Figure 4B).
As the child gets older, the crypts of Fuchs become visible over the course of the developmental changes. As a result, we have to paint more details on the collarette and the stroma. At five years old, the child’s iris color will have stabilized and will probably not change much before the child reaches puberty.
The Sclera Tone
At birth, the sclera is so thin that even the iris shows through. This is why the sclera is white with a bluish hue. At this age, veining is almost non-existent. Later the sclera becomes thicker, the added density whitens the tone, and there is less bluish hue. More vessels appear and remain permanently.8
Pupil Size
Newborn babies have a small pupil because the photosensitive cells are not abundant enough. The optic nerve is not yet sufficiently developed to transmit visual signals from the incoming light, and the lens does not yet allow the eye to accommodate large quantities of light. Therefore, the pupil cannot act as a diaphragm.
Children older than 1 year tend to have greater dilatation of their pupils; therefore, we often make the pupil diameter of the prosthesis from 3 to 5 mm.
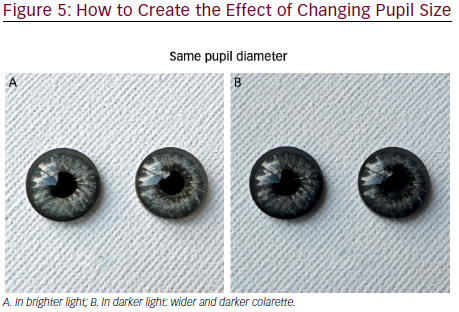
Achieving and maintaining the right pupil size in a prosthesis is a constant challenge because of the light, but even more so if the child’s iris is light in color.
A good illusion to create the effect of changing pupil size of the prosthesis is to slightly widen and darken the collarette. As a result, in brighter light, the pupil will appear smaller (see Figure 5A), while in dark light the deeper and wider collarette will make the pupil will seem larger (see Figure 5B).
Iris Position
It is important to remember that, post-enucleation, the implant does not move up and down as well as it does laterally. However, children must look up to interact with adults. Knowing this, when the ocularist creates the pediatric prosthesis, s/he should try to compensate for this by positioning the iris slightly upward.9
Final Tips
Other than in rare cases, the custom ocular prosthesis should be worn continuously without removing it to clean it. But children will often dislodge or remove their prosthesis themselves. The parents should be instructed on how to insert and remove the prosthesis, and should be able to do this before they leave your office.
It is important to give parents written instructions complete with answers to common questions such how to insert and remove the prosthesis, which secretions are considered normal versus abnormal, etc.
As the child grows, and up until the age of eight, the prosthesis must be checked every 6 months for size, comfort, and fit, and to make sure the socket and eyelids are expanding and growing properly. The prosthesis also needs to be polished and checked.10
Conclusion
It is always a great feeling of satisfaction when the ophtalmologist and the ocularist can see the emotion of the parents who rediscover their child’s restored face once we deliver the finished prosthesis. Suddenly, all of the tears, anxiety, kicking, etc. that we experienced from the initial impression to the final adjustment are magically forgotten.
Experience has demonstrated that a very close and early collaboration between the ophthalmologist, the parents, and the ocularist is extremely important, an it has also has shown the importance of close, early collaboration between the ophthalmologist, the parents, and the ocularist. The pediatric fitting takes a long time and it is a hard work for the team.
The objective is to develop the eyelid and the socket in order to obtain the most satisfying aesthetic and comfortable result:
• Respect the socket by making a custom ocular prosthesis based on the impression of the socket and follow the anatomical development of the child.
• Paint the iris on the appropriate iris button, bi-convex or plano-convex, depending on the age of the child, to achieve the best esthetic rendering.
• Change the color of the sclera according to the age of the child.
• Position the child’s iris slightly upward.
In any event, pediatric fitting remains a challenge that requires a lot of time, energy, and, most of all, an understanding of patient psychology and sensitivity to our patients and their families.

